3 Basic drawing
This chapter describes how to tackle a cave map project, and discusses the problems that arise in composing scraps together to form cave maps.
3.1 Cave projects
The map of a large cave, or of a cave system, is a big project, and needs some data organization to ease its management. The map is usually split into a large number of files, both for the survey, and for the scraps. What follows are merely suggestions, you might find better solutions. [Feel free to tell me your ideas, so that I can improve these notes].
centerlines
3.1.1 Centrelines
Every centerline of a survey trip is written in a survey data file (extension .th) and is enclosed by a survey/endsurvey pair. The name of the “survey” is the same as that of the file. For example the file gm0.th contains “survey gm0”. Therefore the stations have names like “23@gm0”.
Centerlines of the same cave branch can be grouped by a file (extension .th), with the name of the branch, including the survey data files, and with the suitable “equate” commands to connect the centerlines together. The name of the file could also be “index.th” if it groups the survey data of a directory.
Continuing this way you have a hierarchical structure of surveys, up to the root of the tree (which represents the whole cave). This logical structure should be replicated in the filesystem, i.e. in a stucture with .th files and directories. For example, a directory corresponds to a branch of the cave.
All the centerlines of a survey project must be connected to form a single tree of centrelines, or they must all have at least one fixed point, i.e., a point for which geographical coordinates are provided.
scrap
map (.th command)
3.1.2 Scraps and maps
The subdivision of the cave drawing in scraps and maps must be made with care, trying to prevent problems that might arise when they are composed together to form the map of the cave. This requires planning, and, as such, some experience with therion is of great help.
The splitting of the map in scraps does not often correspond to the splitting in surveys. Surveys are usually ended at intersections of passages (crossways), and can cross over themselves following the cave passage in its winding. Scraps, on the other hand, should and in places where the cave passage is simple, to make scrap joining easier, and cannot intersect themselves, therefore the cave passage cannot pass over itself in the same scrap. but two or more scraps must be used for the drawing of a overlying passage. A crossway should be covered by a single scrap.
It is convenient to put the scrap files at the second level of the data file hierarchy, so that each scrap can refer to any survey. A global map file is necessary to collect the other map files and this should be located at the highest level (the first) of the hierarchy.
The scrap files are subdivided in directories, and the scrap files in each directory can be grouped in a “index.th2” file (or with the name of the cave branch). This file “include”s the individual scrap files, specifies the joins among the scraps, and defines the maps.
The naming of scraps, maps, and other graphical items should follow a simple format and be reminiscent of what part of the cave draing they refer to. For example the scraps of the file gm0.th2 could be named “gm0_s1”, “gm0_s2” etc.. The cross-section could be named “gm0_c1” etc. The lines could be “gm0_l1”, the points “gm0_p1” and so on.
In the usual situations, simple “join” commands with the name of the scraps is enough. You may optionally add a parameter count that specifies the number of connections. This works in most of the cases and is much simpler than adding ids to every object (and keeping track of them).
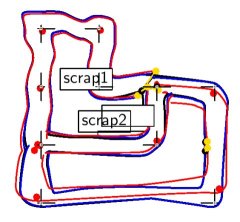
For example the code below joins scrap “testF1s” and scrap “testF2s” in two places (the option “-count” has been added with value 2). The outcome is shown in the figure below (with layout debug option on). The two surveys are positioned by fixing the station named “1” on each. Each shot is 10 m, and “equate” commands have not been used.
  survey testF
    input testF1.th
    input testF2.th
    join testF1s@testF1 testF2s@testF2 -count 2
  endsurvey
3.1.3 Example
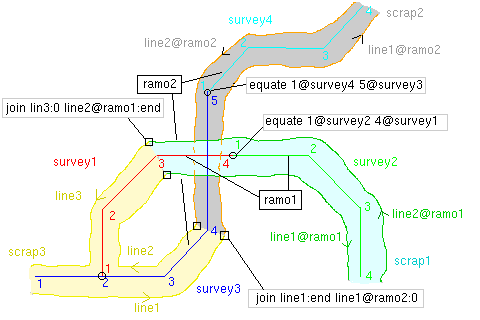
As an example we consider a simple piece of a fictitious cave with two branches. We assume to have two survey for each branch and three scraps for the drawing: one for the intersection, the other two, one each for the two branches. The figure below shows this subdivision.
The data hierarchical structure is
    cave
      +-- branch1
      |     +-- survey1
      |     +-- survey2
      |     +-- scrap1
      +-- branch2
      |     +-- survey3
      |     +-- survey4
      |     +-- scrap2
      +-- scrap3
The four surveys are contained each in one file. For example “survey1” is contained in the file survey1.th:
    survey survey1
    centerline
    data normal from to length compass clino
    1 2 5.00   0 0
    2 3 5.00  45 0
    3 4 5.00  90 0
    endcenterline
    endsurvey
The surveys are grouped in the branches. For example survey1 and survey2 compose branch1, together with scrap1, as specified in the file “branch1.th”. This file imports the two surveys and the scrap, identifies stations in the surveys (“equate” command), and defines a map map1, containing only the scrap scrap1.
    survey branch1
    input survey1.th
    input survey2.th
    input scrap1.th2
    equate 4@survey1 1@survey2
    map map1
       scrap1
    endmap
    endsurvey
break (.th command)
The two branches and the third scrap ( scrap3) are collected in the file “cave.th” which identifies the stations at the intersection and defines how the lines of scrap3 must join with those of the surveys branch1 and branch2. Finally it defines the map map3, with all the three scraps.
    survey cave
    input branch1.th
    input branch2.th
    equate 2@survey3.branch2 1@survey1.branch1
    input scrap3.th2
    join line1@branch1:0   line2:end
    join line2@branch1:end line3:0
    join line1@branch2:0   line1:end
    join line2@branch2:end line2:0
    map map3
      scrap3
      break
      scrap1@branch1
      break
      scrap2@branch2
      #preview below map2@branch2
    endmap
    endsurvey
Notice the naming of the stations in the scraps. For example scrap1 has the stations of survey1 and survey2. Therefore in the definition of the points of type “station” you must give the full name of the station, e.g., “1@scrap1”. Likewise the full name must be used in the “equate” command of the file “branch1.th”. In scrap3 and in the file “cave.th”, which stay at a higher level, the stations are referred to with the subsurvey suffix too, e.g., “2@survey3.branch2”.
Finally the configuration file has the commands
    source cave.th
    select map3@cave
    export map ...
The first says to use the file “cave.th”. The second says to select the map map3 for drawing. The third says which output to generate and how. The result is shown in the figure below.
select (thconfig command)
The “select” command is important when one wants an output with a specific structure. The argument of the “select” command must be a map. It is not possible to “select” scraps. If there are several maps and there is no “select” command the output contains all the maps, even the partial maps that are commented in the global one [thwiki 13, 16]. If there are maps, the scraps not included in any map do not appear in the output. It is possible to repeat the “select” command more than once in the configuration file. All the selected maps appear in the output.
There is only one selection in a configuration file. Therefore it is not possible to select a map, export it in a file, unselect it, and select another map to export on a second file. To have outputs with different selections you need distinct configuration files.
With a double click on the map name in the “Map structure” control of the compilation window, a “select” command for that map is inserted in the configuration file.
names
3.1.4 Names
prefix
Organizing the names of the stations and keep that into account may be hard with a large cave. The prefix command allows to add a prefix to the names imported with the input command, thus reducing the chances of name conflicts.
For example (A. Atkinson 2005-12-22):
prefix name1 > input filename1.th2 > endprefix
S. Mudrak reply:
I am not sure, whether we have understood. From my point of view, everything > you described would work - without needs of knowing this global dataset > structure. Assuming the most simple scenario: >
You have a centerline in survex. There is only one survey “entrance” and > stations are named from 0 to 10. In therion, your dataset (entrance.th) will > be like (… assuming in entrance.th2> stations are without any > prefix - named just 0,1,..,10):> > import entrance.3d -surveys use > > survey entrance > input entrance.th2 > endsurvey >> >
Now you have two such directories: entrance> and continuation> for example. In survex, you have a global file named cave.3d> where stations from entrance > dataset look likecave.entrance.1> and from second datasetcave.continuation.1> and cave.3d> is in the upper level directory. >
Now the corresponding cave.th> file in this directory will be like:> > import cave.3d -surveys use > > survey cave > input entrance/entrance.th > input continuation/continuation.th > endsurvey >> >
And that's all. You are able to work on single piece without knowing global > data structure. You may send only directory continuation> to somebody > without any files from top level directory and it will work. He may edit > it, send it back to you and it will work also. If he will rename this > survey, you just change references in cave.th> and that's all. I do > not see any of problems you have described. >
> Also if I understand you correctly, I would have to edit every station name > > in all the th2 file. >
Certainly not. It looks I missed something. I was wondering, why you use such > a long station names… I need to check your source files once more, may be your > problem is different. >
> From a users point of view, a possible solution is to use some sort of > > prefix name - endprefix that would use the survex naming structure ie add > > name.* to all the stations. >
Scrap already has this possibility via -station-names option. You may add > prefixes or suffixes if you like. >
OK, I will check your files more in the detail, may be I will understand. But > today, thinking is a little bit difficult for me - I drunk something last > night > and I slept only 3 hours… Probably when I will wake up tomorrow, everything > will be clear. >
3.2 Outline
outline
The “outline” option specifies on which side of a line there is the rock. In general it has value “out” for the walls of the cave and value “in” for the walls (type “wall”) of rock pillars between the two branches of a loop.
colors
foreground
Furthermore the contour of s scrap must not intersect itself. If this happens MetaPost gives a warning message: “Warning: scrap outline intersects itself”. You can see what therion thinks is the interior of the cave by coloring the drawing with the layout option “-color map-fg X” (where X is the color or the word “altitude”). The color can be a single number between 0 and 100 for a grey level (0 blak, 100 white), or three numbers between 0 and 100 for the three RGB (red, green, blue) components. For instance “color map-fg 80” gives a light gray, “color map-fg [100 0 0]” gives a full red.
preview
There is also an option for the color of the background, “map-bg”. Other objects that can be colored are “preview-above” and “preview-below”.
reverse (line)
pit
chimney
As a matter of fact it seems that even without the “-outline” option things work fine. Also: what is the interior does not depend either on the direction of the line (“reverse” command of the “Lines” control). The direction of the line is important for the ticks in lines of type “pit” and “overhang”. The yellow tick in the map editor window denotes the side on which the ticks appear in the map. Chimneys are drawn with a dashed line.
It looks like therion completes the outline of the cave passage by joining the open end points of lines of type “wall”, with invisible lines, so that to form a closed contour. Self-intersecting contours are allowed (barring the MetaPost warning). The interior points are those around which the contour makes an odd number of turns. The others are exterior points.
3.2.1 Example 1
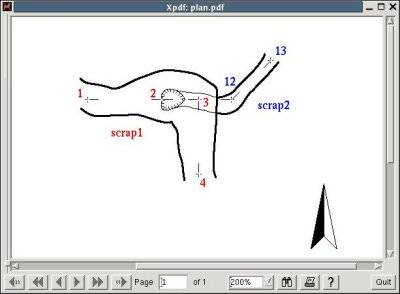
The first example is a piece of fictitious cave with a passage branching from the side of the main passage and passing underneath it. The data are (the branching passage is the shot 11-12)
    1 2  5.00  90  0
    2 3 10.00  45 10
    3 4 10.00  90  0
    2 11 2.00  90 -10
   11 12 15.00 45 -20
   11 21 5.00 120 10
The following figure show how it could be drawn. The red points are the ends of the lines. There are two scraps, one for the main passage, the other for the branching passage. The lines, in the first scrap, that form the border with the second scrap have type “pit”. There are two line joins,
    join s1_l1:end s2_l1:0
    join s1_l2:end s2_l2:end
3.2.2 Example 2
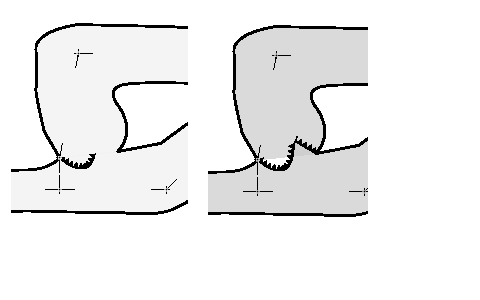
In this example a cave passage has a overhang and there is another passage underneath. The line of the overhang is not regular, and if it were not part of the outline it would be partly inside and partly outside the outline of the passage, and drawn as in the figure on the left below. On the other hand with the “-outline out” option for the overhang, this is drawn correctly, but the join of the two scraps has a portion not colored, as in the figure on the right below.
To get a satisfactory result we must repeat the overhang line, in the second scrap with a line of type “wall” and with the option “-visibility off”. If the two scraps are in the same file this can be done graphically, or by editing the file with a text editor, with a cut-n-paste operation (followed by a change of the type and options of the new line).
If the scraps belong to different files, it is still possible to do it, but it takes more work. You open the two files with the text editor of xtherion and you copy the line “overhang” from the first to the second. You change the line type and options in the latter. For the moment, however, you set “-visibility on”, because in this way it is easier to see where the line is drawn. At this point you must move the points of the new line, changing their coordinates until in the resulting PDF file the new line is overlaid to the “overhang” line (at least with the precision of the width of the stroke used to draw them). It is a slow process, because the two scraps usually have different references. It is usually sufficient to attain an accuracy of the unity in the point coordinates. The result can be seen in the figure below.
To get a very accurate overposition, inhibit the drawing of the centerline (layout option “symbol-hide group centerline”) and redefine the width of the line stroke (also change the type of the overhang line with “wall”, temporarily), with the following Metapost code
   code metapost
     def PenA =
       pencircle scaled (0.001);
     enddef;
   endcode
In this case even small discrepancies are clearly visible and you can achieve a more precise overposition of the two lines.
3.2.3 The algorithm
S. Mudrak posted a note on the algorithm that computes the outline (2005-12-21).
This is the situation where wall invisible should be used :) The scrap outline > generation algorithm works wrong way in this case.
When the algorithm is creating scrap outline, it goes from end of one line to > the nearest end of second line. In your case, when it comes to the end of > debris line, it connects the second line, but on the wrong end. Than triangle > appears.
When you will connect the end of debris line with invisible wall to the > correct wall end on the other side of the passage, your problem should be > fixed (at least on my machine is). Matapost also complains about this - > that scrap outline intersect it self.
I know, that this algorithm can be improved, but… But at least, I will put > it in the TODO list.
visibility (option)
The algorithm of the outline follows the lines and when it reaches the end of a line it joins it with the closest end of another line. It may happen that this algorithm connects with the wrong endpoint. In this case you should add invisible (option “-visibility off”) lines of type “wall”, to correct the drawing.
3.3 Joining scraps
join (.th command)
When the scraps are drawn in the same map file (and possibly with the same background image) it is possible to start the lines of a scrap where those of the other end, so that there are no problems when they are assembled to compose the cave map.
However scraps are often drawn independently and they must be joined together in the final map. The join command tells therion how to connect the lines of two scraps.
The syntax of the command has two forms: it can take either the names of the scraps or the name of the line points (usually “line:0” for the starting point and “line:end” for the end point).
Advice: try to split the cave map in scraps that join where the cave is simple, possibly straight, and with no features. Therefore avoid joins at crosspoints, and try to make the joins in the middle of a gallery, in a place where there is no symbol. Above all avoid joins that might split an area symbol (eg, water pool). Unfortunately, cave surveys have the tendency to end at crosspoints, and it happens to draw scraps that end (and therefore must join) at crosspoints.
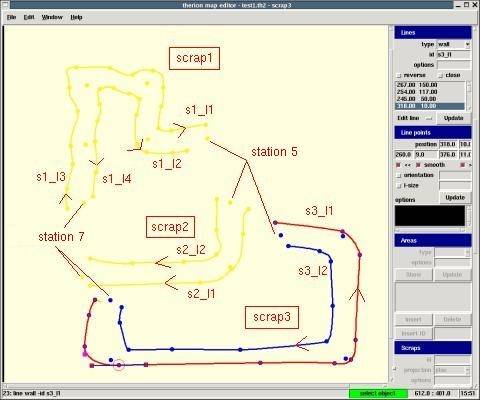
The following example shows the usage of the join command, and addresses the case of a join at a crosspoint. The cave data are fictional: the centerline is composed of two loops, and there are three scraps: a scrap for each branch of the loops.
The above figure shows the map editor with the “.th2” file containing the three scraps. xtherion displays the inactive (i.e., not selected) scraps with a yellow color [thbook 29].
To properly join the scraps the survey data file must have the join commands for the endpoints of the lines of the scraps. The join commands are written inside the survey block, but outside the centerline block.
   input test1.th2
   join s1_l1:end s3_l1:end
   join s1_l2:end s2_l2:0
   join s2_l1:0 s3_l2:0
   join s2_l1:end s3_l2:end
   join s2_l2:end s1_l4:end
   join s3_l1:0 s1_l3:0
debug
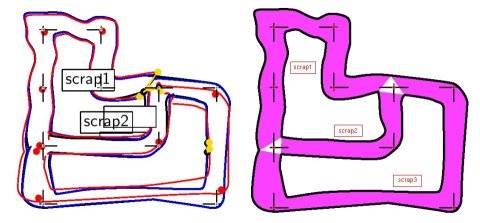
The outcome of the processing is shown in the figure below. The intermediate steps of the processing are display using the “debug” option of the “layout” (“-layout-debug on”). The position of the scraps after the linear transformation that takes the “station” points as close as possible to the stations of the survey is shown in red. The position after the non-linear transformation that takes the “station” points on the survey stations is shown in blue. This is the map before the joins. The result after the join is shown in black. This is the final map.
foreground
The final map looks good. There is however a mistake. If we color the cave outline (for instance with the layout option “-layout-color mag-fg altitude”), the two regions of the joins have a white triangular hole. In fact therion completes the contour of the outline of each scrap with a segment at both ends. To fill the triangular holes, the scrap outline should extend a little beyond these segments when the scraps are joined together. Unfortunately therion does not do this.
A solution to this problem is to avoid scrap joins at crosspoints of three or more passages. In other words, avoid joins at 'Y' junctions and place them where the cave passage is linear.
Another solution is to add to a scrap a small piece of the cave wall opposite to the scrap end. In this way the junction becomes a 'T' (the scrap with the added piece of wall is the vertical bar, the other two scraps are attached on the opposite sides of it, without joins between them).
outline
A third solution is to add to a scrap a point of type “bedrock”, beyond the end, and a (zero-length) line of type “wall” from this point to itself (Ctrl-L and click twice on the point). Finally you must add the id of the point in the list of the join command that links the lines of the other two scraps. Without the “wall” line (even if this has zero length) the triangular hole is not removed. If the line is not of type “wall”, you must add the option “-outline out” (or “-outline in”) to specify that it belongs to the contour of the scrap.
3.4 Other examples
map (.th command)
The map command allows to organize the scraps and the “surveys” in the presentation of the output cave map. It is a multiline command with syntax
    map id_mappa -proj projection_type
      scrap | survey | map
      ...
      break
      scrap | survey | map
      ...
      preview above map
    endmap
break (.th command)
The break command breaks the map on several levels. There can be more than one break. Each level contains one or more objects of type “scrap” or “survey” or “map”. Each object is written on a line. All the objects in a map must be of the same type. Therefore you can make “maps” of “scraps”, “maps” of “surveys”, and “maps” of “maps”. If the map is made of scraps these must have the same projection type, otherwise there is an error of “projection mishmash” [thwiki 6]. The projection type can be “plan”, “elevation”, “extended”, or “none”.
preview
The preview command is optional. It says to insert the contour of a map above or below the map that is defined. It is useful when there is a cave passage underneath another and you want to draw its contour [thbook 26].
3.4.1 Drop with underpassage
join (.th command)
As an example we take a cave passage with a pit in the middle of it and a lower passage departing from the bottom of the pit. The relevant piece of the centerline is:
 survey test5
 ...
 survey s1
    ...
    input test5_s1.th2
 endsurvey

 survey s2
   ...
   input test5_s2.th2
 endsurvey

 ...
 join s2_l1@s2:0 s1_pit@s1:2
 join s2_l2@s2:end s1_pit@s1:6

 map map22 -proj plan
   scrap2@s2
 endmap

 map map5 -proj plan
   scrap1@s1
   break
   scrap2@s2
   preview above map22
 endmap

 endsurvey test5
preview
The drawing is made of two scraps: the first for the main passage, and the second for the lower passage. The walls of the second scrap are joined, with two join commands, to the lines of the pit in the first scrap. Each scrap is contained in one survey. The global survey defines two maps: map22 with the scrap scrap2 of the survey s2, and map5 for the presentation. This last map has two scraps on two different levels and a preview above command with the map map22.
select (thconfig command)
Finally it is important that the configuration file contains the command to select the map map5,
select map5@test5
The outcome is shown in the next figure. Without the “break” command both scrap outlines would appear in the map. With the “break” you put them on different levels, and the first hides the second where they overlap. Without the “preview” (or with a “preview below”) the outline of the second scrap would not be drawn in the map, and the drop would not be connected to the lower passage.
3.4.2 Overlying passages
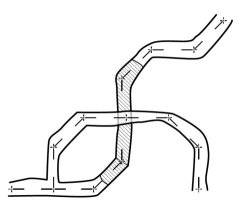
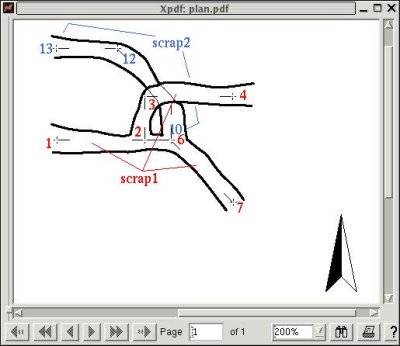
This example contains a passage passing under another. The first scrap has a crossway, The second scrap is attached to the right branch of the crossway and passes underneath the left branch.
3.4.3 Side backpassage
This example shows a side passages departing from the main gallery and going backward and downward, passing below the main passage.
outline
overhang (line type)
There are two scraps. The first scrap is the main gallery from the left to the right. The north wall is broken at the point the side passage starts with two lines, a “contour” and an “overhang”. The latter has the option “-outline out” to tell therion that it belongs to the outline of the scrap.
The second scrap contains the side passage. It must join the first in three points: the two points where the north wall of the first is broken, and the other endpoint of the “overhang” line. The wall of this scrap is split into two lines to refer to the endpoints on the lines in the “join” commands. We could have used a single line and referred to the intermediate points in the “join”s.
     join s1_over@s1:end s2_l1@s2:0
     (or "-outline in") to specify that it belongs to the scrap outline
     join s1_l1@s1:0 s2_l2@s2:end
     join s1_l2@s1:end s2_l2@s2:0
The next figure shows the result of this example. The colors have been added to emphasize the lines referred to by the “join” commands.
offset (map)
3.4.4 Offsetting scraps
extend (.th command)
If the cave drawing is too messy with all the scraps in place, you may offset a portion of the map to the side of the main cave map. To achieve this insert a virtual shot in the centerline splitting the station where the piece joins the main map. For example
    data normal from to length compass clino left right up down
    ...
    flags duplicate
    extend ignore
    20 20a 10.00 90 0 0 0 0 0
    14 14a 10.00 0 -90 0 0 0 0
The command “extend ignore” tells therion to ignore the horizontal shot in the extended elevation map. The vertical shot is already ignored in the plan.
join (.th command)
In the scrap of the offsetted map use the station “20a” and insert the station point “20” at a suitable distance, according to the virtual shot data. Next insert a label line with text a sequence of dashes, e.g., “- - - - -”. Be careful to comment the “join” commands that link the offsetted scrap to the main map. The example below shows a piece of the extended section offsetted above the main map.
wall (line type)
Alternatively you can introduce a scrap with only the two stations and a straight “wall” line between them. Add the option “-subtype presumed” to the wall to draw it dashed in the map.
This is not a completely satisfactory solution to the problem. Ideally one would like to have the outline of the offsetted scrap (or map) in the main map drawing as well. A solution would be to have the possibility to compose maps (“map” command) specifying the offset of the scraps/maps.
3.4.5 Vertical walls
Therion places the line points according to their distances from the station points in the scrap and to the 3D position of the stations (obtained from the centerline data).
It may happen that a vertical wall does not look really vertical in the outcome, because the sketch is not drawn well to scale, and therefore neither the scrap is so.
You can tell therion to draw a piece of a line vertically by adding the option “adjust vertical” (without the leading dash) to one, or more, of the line' points. Every point with this option is adjusted vertically with the previous point.
A similar problem can occur with horizontal surfaces, like the surface of a pond. Again, horizontality can be forced using the line point option “adjust horizontal”.
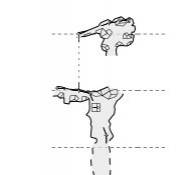
3.4.6 Window in the wall
To draw a window in the wall in an extended section you draw the walls of the window passage with dashed lines, in the portion that overlaps with the section of the main passage.
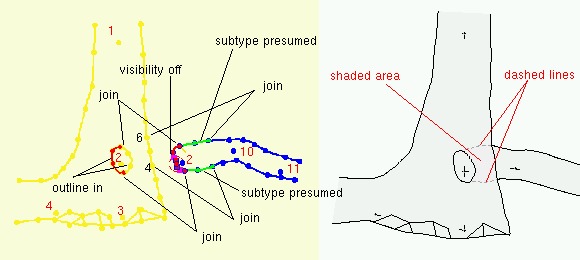
In this example a pit has a window, and the contour of the window is drawn in the pit scrap with two lines of type “wall”, one for the left side, the other for the right side (one line would have been enough, but with two lines the scrap joins are easier). Both lines have the option “-outline in” so that the window would appear as a white hole in the pit map.
The contour of the window passage (in a second scrap) is broken at the intersection with the pit wall and the lines from the window to the wall have the option “-subtype presumed”, so that they are rendered as dashed lines (this is not necessary: if the walls are not marked presumed, they are displayed in light grey, which is fine: it depends what you want to get). Furthermore the endpoints of these lines are use in the “join” of the scrap. To this extend it is necessary to insert line points in the pit wall (on the right in figure) at suitable positions.
Finally the window left wall must be replicated in this second scrap so that the background in the final map is properly colored, with a shaded area only where the window passages overlaps the pit wall.
The figure below displays the result. The xtherion sketch, on the left, has been colored for clarity. The “presumed” walls are shown in green; the left window wall is in red. The names of the stations are in red. The black numbers are the indices of the line-points of the right wall of the pit, used in the “join” commands. On the right is the result in the pdf document. You can see the dashed lines for the passage behind the pit and the shaded area.
3.5 Cross sections
cross section
A cross-section is a scrap, a point in (a scrap of) the map that defines where to place the cross-section, and a line that show where in the map it refers to (and from which direction).
scrap
3.5.1 Scrap
The drawing of a cross-section does not differ much from that of a scrap of the plan or of the extended section. You use points and lines.
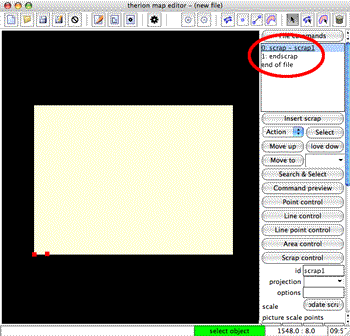
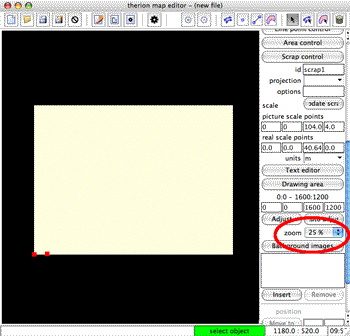
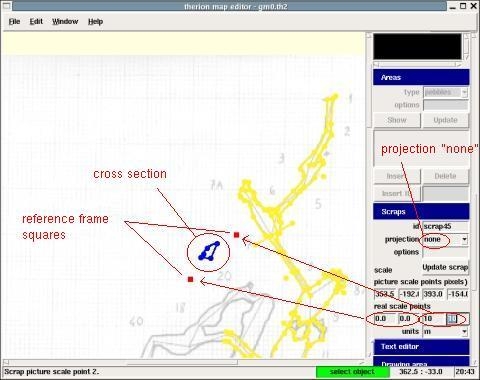
The novelty is that (usually) the cross-section does not contain more than a “station” point (it can have none). It is therefore necessary to define the scale of the scrap. To this aim you use the small red squares in the lower left and right corners of the canvas. These squares are only visible when the scrap line is highlighted. If dragging them to position is tedious (or you can't find them) then enter the x,y co-ordinates for a point on the section into the 'picture scale points' fields. Another trick is to zoom out the scale to 25 % and move the red squares by mouse.
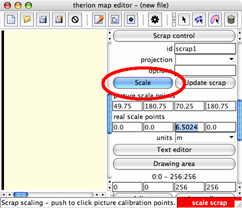
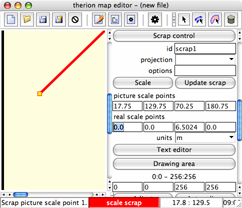
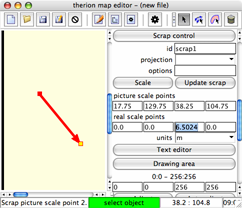
Improvement from 21. 12. 2006: In Scrap control section you may find a new button “Scale”. After you press this button you may click in drawing area and insert first scale point. Second click will insert the second scale point. The red arrow always connects the first and second scale point.
You start by inserting a new scrap (menu “Edit | Insert - scrap”) and set its projection type to “none”. Draw the scrap lines and points. If there is one put in also a station point (type “station” and option “-name”). However the scrap is still without a scale. To define its scale move the two little red squares that appear in the lower part of the canvas around the scrap (click on each of them with the mouse, and drag it). Put the left square at the lower-left of the scrap and the right one at the upper-right. Now in the “Scraps” control enter in the textboxes the coordinates (in meters) for these two virtual points: (0,0) for the lower-left square, and (positive) suitable values for the other.
The little red scrap scale squares can be hard to find and move. These squares are only visible when the scrap line is highlighted. If dragging them to position is tedious (or you can't find them) then enter the x,y co-ordinates for a point on the section into the 'picture scale points' fields, and hit 'update scrap' to make them appear near the section.
point (.th command)
section (type)
scrap (option)
3.5.2 The "section" point
To place the cross-section in the map, you must insert a point of type “section” in a scrap of the map. Put it in the place where you want to show the cross-section. The point must have the “-scrap” option followed by the name of the scrap of the cross-section.
line (.th command)
3.5.3 The "section" line
Finally you need a line of type “section” in the scrap of the map (plan or elevation) to identify the place the cross-section refers to. This line is usually rendered with two L-shaped pieces, the transversal segments indicating the direction of view of the cross-section.
Draw a line (a segment) with only the two endpoints dragging the mouse, so that the endpoints have handles, as the lines of smooth curves. Select the menu “Edit | Insert line” (or Ctrl-L), click on the first endpoint (outside the scrap outline) and drag the mouse towards the wall. Release the mouse button before the wall. Next click on the second point (on the other side of the scrap) and drag again the mouse towards the (other) wall, releasing it before reaching the wall.
direction (option)
Set the line type to “section”, and add the option “-direction both” to state to show the direction of view on both endpoints. Other option values are “end” and “begin”.
Further information
3.A xtherion mouse and shortcuts
3.A.1 Mouse actions
| Line | Point | Area | |||
| insert | select | insert | select | insert | |
| left | point | existing point | at position | existing point | |
| Ctrl + left | close to existing point | close to existing point | |||
| left + drag | with handles | move point | move point | ||
| Ctrl + left + drag | close to point, with handles | move close to point | move close to point | ||
| right | previous point | add line to contour | |||
| Esc | end | end | end | ||
| left on last | end | ||||
| left on first | end and close | ||||
| Ctrl-L | start new line | ||||
| Ctrl-P | new points | ||||
| Ctrl-A | new area | ||||
3.A.2 Shortcuts
Shortcuts are combinations of keys with the same effect as a menu selection or a mouse click on a button of the graphical interface.
- ESC switch to select mode (map editor)
- F9 compile the project
- F1 switch to the text editor interface
- F2 switch to the map editor interface
- F3 switch to the compiler interface
- Alt-F open the “File” menu
- * Alt-N new file;
- * Alt-O open a file;
- * Alt-S save the file;
- * Alt-A save the file specifying the name (text editor);
- * Alt-U activate/deactivate automatic save (text editor);
- * Alt-X display the next file
- * Alt-P display the previous file
- * Alt-C close the file
- * Alt-Q exit
- Alt-E open the “Edit” menu;
- * Alt-S select (map editor);
- * Alt-I insert (map editor);
- * Alt-D remove (map editor);
- * Alt-Z change zoom (map editor);
- * Alt-U cancel the drawing area adjustment (map editor);
- Alt-W open the “Window” menu;
- * Alt-A maximize the window
- * Alt-O revert the window size to normal
- * Alt-W switch the place ot the controls panel
- Alt-H open the “Help” menu;
- * Alt-A display the version number of xtherion
- * Alt-B open the BAC calculator;
- * Alt-C show the most frequent commands
- Ctrl-N open a new file,
- Ctrl-O open an existing file
- Ctrl-S save the open file
- Ctrl-W close the open file
- Ctrl-Z undo the last action
- Ctrl-Y redo the last action
- Ctrl-N display the next file (text editor);
- Ctrl-P display the previous file (text editor);
- Ctrl-R insert a new scrap (map editor);
- Ctrl-P insert points (map editor)
- Ctrl-L insert a line (map editor)
- Ctrl-A insert an area (map editor), select all (text editor)
- Ctrl-X cut;
- Ctrl-C copy;
- Ctrl-V paste;
- Ctrl-I autoindent (text editor)
- Ctrl-D remove (map editor)
- Ctrl-Q exit.
